
5 Mini Plastic Dessert Cups Tips for Easy Christmas Treats
The holiday season is all about creating joy, but you want to impress guests without spending all day in the kitchen. We have the perfect solution for you. Mini Plastic Dessert Cups let you serve beautiful, single-serving treats that look amazing. Your guests can enjoy a little taste of everything, a trend that everyone loves. These plastic dessert cups make it simple to create stunning Christmas desserts. Get ready to feel confident and inspired to "Host Like a Pro" this holiday season! 🎄
Key Takeaways
-
Choose the right mini plastic dessert cups. Different shapes work best for different desserts.
-
Use no-bake fillings for easy Christmas treats. This saves oven space and time.
-
Layer desserts neatly with a piping bag. This makes them look professional.
-
Prepare desserts ahead of time. This reduces stress on party day.
-
Add simple decorations just before serving. This makes desserts look festive and fresh.
Tip 1: Choose the Perfect Mini Plastic Dessert Cups
Choosing the right container is your first step to dessert success. The shape of your cup can make your treats look even more delicious. Think of the cup as the frame for your edible work of art!
Match Cup Shape to Dessert Style
Different shapes complement different types of desserts. You can create a beautiful and mouthwatering display with the right pairing.
-
Round or Stemmed Cups: These classic shapes are perfect for soft, airy desserts. They beautifully showcase layers in treats like fruity parfaits or creamy chocolate mousse.
-
Square Cups: A modern square shape gives your desserts a chic, sophisticated look. They are fantastic for layered trifles, cheesecakes, and puddings, creating clean lines that look professional.
Choosing the right shape makes your individual servings look extra special for any party.
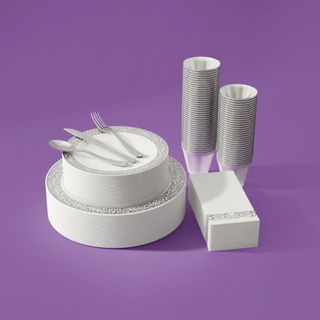
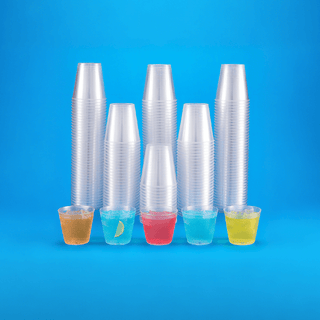
Feature Jolly Chef Square Cups
For a truly elegant and modern presentation, you will love our Jolly Chef 2oz/3oz Square Plastic Dessert Cups. These mini plastic dessert cups are a perfect example of style meeting convenience. They are made from premium, durable clear plastic, so your colorful Christmas layers shine through beautifully.
Party Planner's Dream: These cups are reusable and stackable! This makes storage and cleanup a breeze, saving you time and effort.
Each set also includes perfectly sized spoons, so your guests can dig in right away. You get everything you need in one package. Using these high-quality mini plastic dessert cups ensures your holiday treats look as good as they taste, helping you "Host Like a Pro" with zero stress.
Tip 2: Focus on No-Bake Festive Fillings
The best part about making mini desserts? No oven required! No-bake fillings are your secret weapon for a stress-free holiday. You can free up precious oven space for your main dishes and whip up delicious treats in minutes. This approach saves you time and keeps your kitchen cool and calm.
Whip Up Easy Christmas-Themed Fillings
You can easily create fillings that taste just like Christmas. Think of classic holiday flavors that everyone loves. These simple ideas look incredibly elegant when served in clear dessert cups with a spoon.
Here are a few festive, no-bake ideas to get you started:
-
White Chocolate Peppermint Mousse: A light and fluffy mousse with a cool peppermint flavor. It looks like a beautiful blanket of snow in a cup!
-
No-Bake Eggnog Cheesecake: Capture the creamy, spiced flavor of eggnog in a rich cheesecake filling. This one is always a crowd-pleaser.
-
Classic Tiramisu Cups: Layer coffee-soaked ladyfingers with a sweet mascarpone cream for a sophisticated Italian favorite.
-
Berry Cheesecake Mousse: A simple blend of cream cheese, whipped cream, and berry puree creates a vibrant and fruity option.
Add Essential Layers for Texture
A great dessert has more than just good flavor—it has interesting textures! Adding different layers makes every spoonful a delightful surprise. You can easily add crunch and softness to your Mini Plastic Dessert Cups for a professional touch.
Pro Tip: Mix and Match Your Layers! A little texture goes a long way. Try adding a thin layer of one of these between your creamy fillings:
For Crunch: Crushed gingerbread cookies, chopped nuts, toffee bits, or even crunchy granola.
For Softness: A simple fruit layer, like a festive cranberry compote, adds a bright and tangy contrast.
Alternating a creamy filling with a crunchy or fruity layer creates a beautiful look and a balanced bite. Your guests will love discovering the different textures as they enjoy their treat.
Tip 3: Master the Art of Easy Layering
Creating those beautiful, distinct layers you see in fancy dessert shops is easier than you think! The key is using the right tools and techniques. This gives you a professional-looking dessert that will have everyone asking for your secret. Layering adds visual appeal and makes each bite a perfect mix of flavors and textures.
Use Piping Bags for Clean Layers
The secret to those perfect, clean lines? A piping bag! Using a bag helps you place soft fillings like mousse or cheesecake cream exactly where you want them, without smudging the sides of your Jolly Chef Square Cups. It’s a simple trick that makes a huge difference.
If you're new to piping bags, don't worry. Here’s a quick guide:
-
Place the bag inside a tall glass and fold the edges over the rim. This holds it steady while you fill it.
-
Spoon your filling into the bag, but only fill it about halfway.
-
Press the filling down to push out any air bubbles, then twist the top of the bag to seal it.
-
Squeeze with steady pressure from the top to create a beautiful, even layer.
No Piping Bag? No Problem! You can use a simple Ziploc or sandwich bag instead. Just fill the bag, snip off a small corner, and you have a DIY piping tool. It gives you great control for neat results.
Create a Firm and Even Crumb Base
A great dessert cup starts with a solid foundation. A firm crumb base not only adds a delicious crunch but also acts as a stable dam. It holds your creamy fillings in place and prevents them from making the bottom layer soggy.
For a perfect base, mix your crumbs (like crushed gingerbread, Oreos, or graham crackers) with a little melted butter. Spoon about a tablespoon of the mixture into each cup. Then, use the back of one of your included spoons or the bottom of another dessert cup to press the crumbs down firmly and evenly. This creates a solid, level surface that’s ready for your first layer of festive filling. ✨
Tip 4: Prep Ahead for a Stress-Free Party
One of the best ways to "Host Like a Pro" is to do as much as you can before your guests arrive. This tip is all about giving you back your time on party day. You can prepare your mini desserts in advance so you can relax and enjoy the celebration with everyone else.
Assemble and Chill Desserts in Advance
Many no-bake desserts actually taste better after they have had time to chill and set. This allows the flavors to meld together perfectly. You can assemble most of your mini desserts a day or two before your Christmas party. This is a huge time-saver!
Desserts that are perfect for making ahead include:
-
Creamy custards and puddings
-
Rich chocolate or peanut butter mousse
-
Layered desserts with a brownie or cookie base
-
No-bake cheesecakes
For example, a no-bake cheesecake filling can be prepared and refrigerated for a day or two and will still be incredibly delicious for your guests. Just assemble your layers in the Jolly Chef Square Cups, cover them, and pop them in the fridge. Your treats will be ready to go when you are.
Party Pro Timeline: Plan your prep by working backward from when the party starts. Decide when your desserts need to be ready. This helps you schedule when to assemble them in the days leading up to the event. You will feel so much more organized!
Add Final Toppings Just Before Serving
While you can make the main dessert ahead of time, you should save the final garnishes for the last minute. This keeps everything looking fresh and tasting its best. Adding toppings just before you serve prevents them from getting soggy or losing their crunch.
Wait to add delicate items like:
-
A dollop of fresh whipped cream
-
A sprinkle of cocoa powder or crushed peppermint
-
Fresh berries or a sprig of mint
-
A final drizzle of chocolate or caramel sauce
This final touch takes only a few seconds per cup but makes your desserts look like they just came from a gourmet bakery. Your guests will be so impressed, and you will be stress-free. ✨
Tip 5: Add Simple and Festive Decorations
The final flourish is what makes your desserts truly memorable. Decorations are your chance to add a pop of holiday cheer. You don't need to be a pastry chef to make your mini desserts look stunning. A few simple touches can transform your treats from simple to spectacular.
Elevate with Quick and Elegant Garnishes
The right garnish adds color, texture, and a festive feel. You can turn a simple mousse into a work of art with just a sprinkle of something special. Best of all, these ideas take only seconds to apply.
Here are some quick and elegant garnish ideas for your Christmas treats:
-
Crushed Peppermint or Candy Canes: Nothing says Christmas like peppermint! A sprinkle of crushed candy canes adds a festive sparkle and a cool, minty crunch.
-
Chocolate Shavings: Use a vegetable peeler on a bar of chocolate to create delicate, beautiful shavings. They look so fancy on top of any creamy dessert.
-
Festive Sprinkles: A dash of red and green sprinkles or edible glitter is an incredibly easy way to add holiday color.
-
A Single Berry and Mint Leaf: Place a single raspberry or a small sprig of fresh mint on top for a fresh, elegant look.
Easy Crushing Tip: To make crushed candy canes, just place them in a plastic zipper bag. Then, gently roll over the bag with a rolling pin a few times. It’s that simple!
Tie It All Together with a Holiday Ribbon
Want to take your presentation to the next level? Add a small ribbon around each dessert cup. This simple detail ties your whole theme together and makes each dessert feel like a tiny, personal gift for your guests. It’s an extra touch that shows you care.
You can choose a ribbon that matches your party's decor. A thin, red satin ribbon adds a classic touch of elegance. For a cozy, rustic feel, try tying a bit of plaid fabric or even simple burlap twine around each cup. This small step makes a big impact and truly helps you "Host Like a Pro." 🎁
You now have five simple tips to create amazing holiday treats! Remember to choose the right cup, use no-bake fillings, layer neatly, prep ahead, and add festive toppings. These ideas help you make beautiful Mini Plastic Dessert Cups that look stunning on a tiered display. Creating impressive Christmas desserts doesn't have to be stressful. Go ahead and try these tips to enjoy your party and truly "Host Like a Pro." 🎉
FAQ
Can I reuse the Jolly Chef dessert cups?
Yes, you absolutely can! Our Jolly Chef Square Cups are made from durable, high-quality plastic. You can hand wash them with soap and warm water. This makes them a great, cost-effective choice for all your future parties. 🧼
How long can I store the desserts in the fridge?
You can typically prepare and store no-bake desserts for 1-2 days in the refrigerator. This is perfect for getting ahead of party prep! Just be sure to cover them to keep them fresh and add delicate toppings right before serving.
What else can I serve in these mini cups?
These cups are incredibly versatile! You can use them for more than just desserts. They are perfect for serving individual appetizers like shrimp cocktails, veggie dips with a breadstick, or even small fruit salads. Get creative with your party menu! ✨


